The RGBDToolkit is a fun piece of kit for tinkerers and artists, but it comes with a steep learning curve. This post will guide you through the hardest part - calibration.
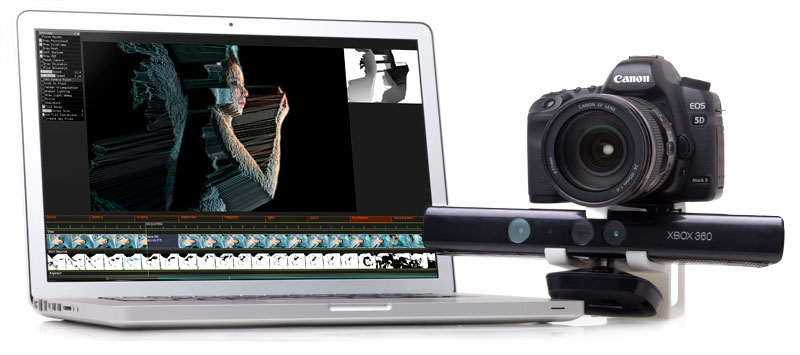
Ultimately calibration is about combining two commercial products which weren't designed to be combined - a depth sensor (either a Kinect or an Asus Xtion), and a DSLR (or some kind of RGB camera). Although it is undeniably difficult at first, the RGBDToolkit makes this process far easier than it would be if you were starting from scratch, and it gets easier and quicker with time.
This tutorial only covers calibration (pre-production). There is some great information on capture and visualizing here, and also here is a really good visualizer tutorial video from the workshop.
Why this tutorial?
The RGBDToolkit guys write and maintain an in-depth tutorial on the website. It covers all bases and so is pretty dense. However, I found it easier to work from my own notes (made during an RGBD workshop). This post is just a write-up of those notes.
This article talks in terms of the kit I am using (and I recommend this where possible):
- Mac / OSX
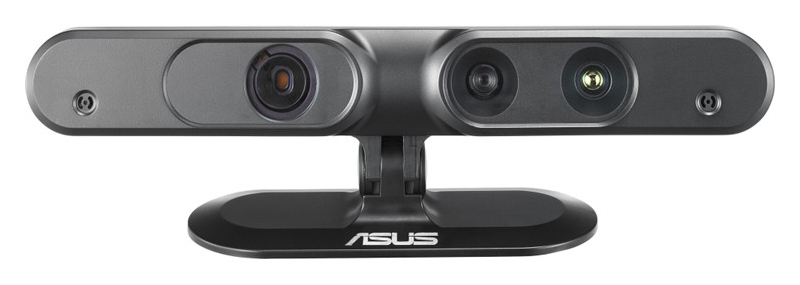
- Xtion Pro Live
- Prefabricated mount purchased from the RGBDToolkit store
This post should still be pretty useful if you have a Kinect, or are using Windows, but may deviate in places. That said, it's mostly the same.
To follow along, you will also need:
- An A3 checkerboard, printed out and flatly glued or spray-mounted onto foam board or other flat surface
Ok, let's get started!
1. Install the software
You'll need the software to get started. There is a landing page for downloads here, so you can check if there is a newer version. I used v005:
- If you are using an Asus Xtion, download and install the Sensecast drivers
Otherwise, the RGBD software will crash on launch - Download the beta v005 (application only)
zipfile
- There are two application downloads for OSX, one with example data and one without example data
- The link above is for thezipwithout example data. If you want example data, you can download the beta v005 (with example data)zipfile here instead - Unzip the
zipfile and take a look inside the resulting RGBDToolkit folder
The folder will be called something likeRGBDToolkit_preRelease_005_OSX - Among other things, you will find four
appfiles inside:
-RGBDCaptureKinect_1414.app
-RGBDCaptureKinect_1473.app
-RGBDCaptureXtionPro.app
-RGBDVisualize.app - Go back outside the folder, and drag the entire folder into your Applications folder
- Plug your depth sensor's USB cable into your computer
- Launch the appropriate one of the three
Capture apps for your depth sensor
- Whichappto launch depends on which depth sensor you have - read about that below
- If all goes well you should see the depth sensor's live feed in theCapture appsoftware's preview window
- If there is a problem, try quitting theCapture app, unplugging the depth sensor, replugging the depth sensor, and relaunching theCapture app - When you have verified it works, quit the
Capture appfor now, and unplug the depth sensor's USB cable from the computer
In the next step we will be mounting the depth sensor to the camera, and that will be easier if the depth sensor is not plugged in to your computer!
There may be four app files, but there are really only two app files you'll ever be working with. This is because there are separate Capture apps for three different models of depth sensor, so you'll choose the appropriate one for you and stick to it (I'm using the RGBDCaptureXtionPro app because I have an Asus Xtion Pro depth sensor). There is a single Visualize app regardless of which depth sensor you use.
As for the difference between Capture and Visualize, you can think of the stages of the RGBDToolkit process in cinematic terms:
- Pre-production
Getting ready to shoot, preparing - Production
Actually shooting footage - Post-production
Doing something with the footage you shot, editing
The Capture app covers both pre-production and production, and the Visualize app covers post-production. The calibration process described in this tutorial is exclusively in the pre-production phase.
2. Mount the camera to the depth sensor
You can buy a mount from the makers of the RGBDToolkit. At the time of this writing there is a link at the top-right corner of the official website, and they deliver anywhere.
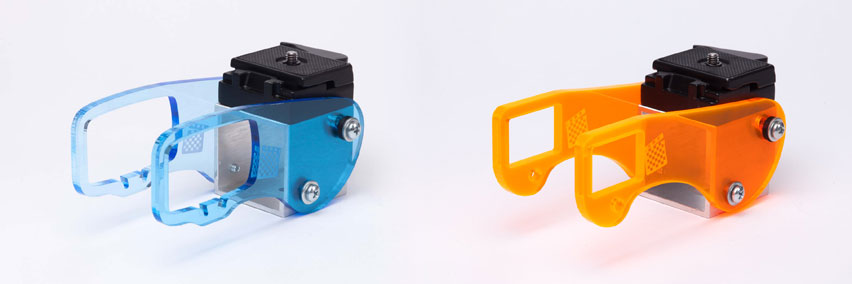
There is a mount for the Asus Xtion and a mount for the Kinect, you need to make sure you buy the appropriate mount for your particular depth sensor.
Here you have a choice. You can watch the video, or continue along with the written steps. I'd recommend both, in that order. Watch the video to get a sense of what we are doing, then follow the steps to make sure you do things in the right order!
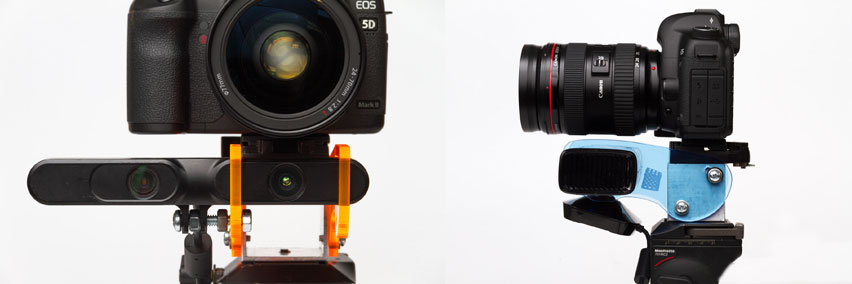
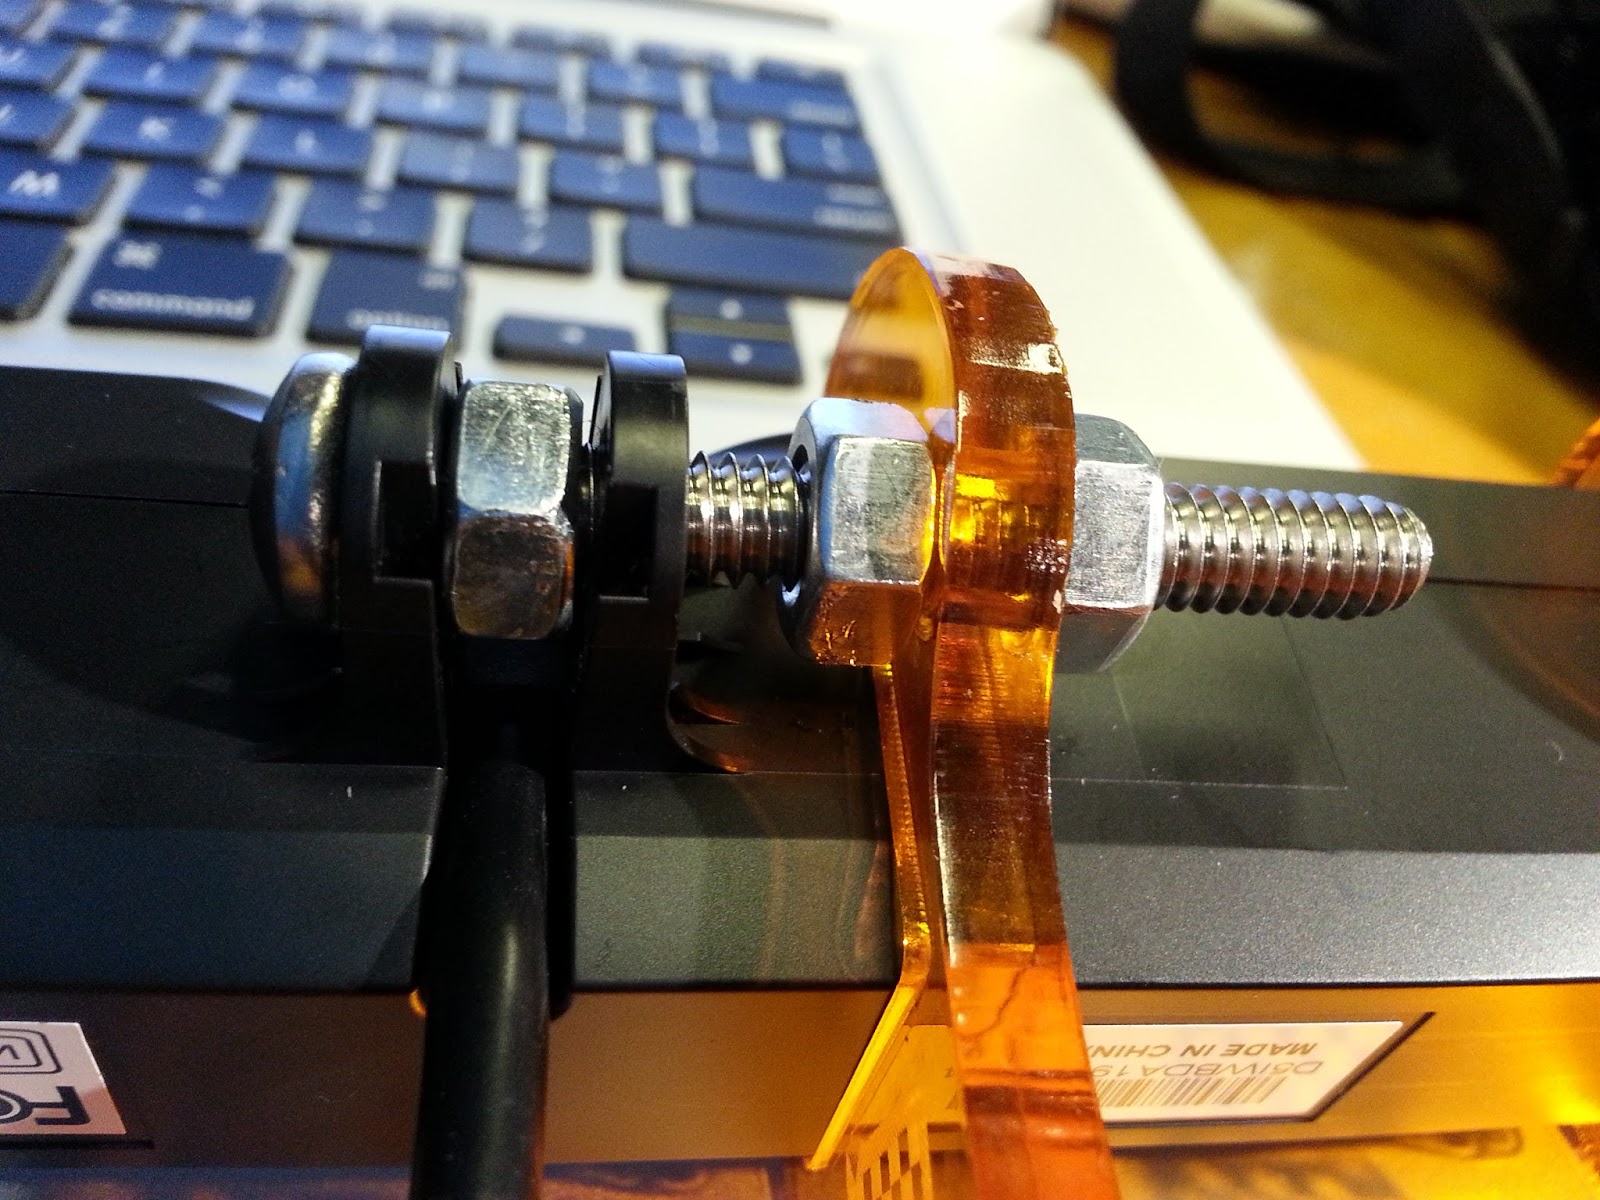
Take a look at the image below. With the Xtion mount you need an extra bolt and three nuts (included in the package) to keep things in place. In case you ever need to replace these extras, it's just a 1.5" long 1/4"-20 bolt with three 1/4"-20 nuts.
I found it handy to have a screwdriver, an adjustable wrench, and a pair of pliers for this part.
- Screw the orange RGBD mount wings to the metal box, with the four small screws
Don't tighten these screws too much, we are going to adjust these later - Remove the base plate from the Xtion
Just nudge the plastic covers with your fingernail, and then unscrew the screw you find inside - Place a nut in between the two screwholes of the Xtion base, hold it steady, and feed the long screw through by screwing it through the nut
- We are not touching the RGBD mount at this stage, it is to one side
- Use the screwdriver and pliers to tighten the screw to the nut - Once that is tight, add the next nut, followed by the RGBD mount, followed by the last nut
- Locate the depth sensor on the front of the Xtion - line up the mount so that the depth sensor is in the middle of the two orange mount wings
- Use the pliers to hold the middle nut still while you use the wrench to tighten the last nut - no movement should be possible on this once you are done
- Place your DSLR on the top using the quick release plate provided
You now have a camera rig! - Place the camera rig on a tripod
This is only required during calibration, you can take it off the tripod when you want to film
3. Set up the DSLR
Get your DSLR ready to be a movie camera.
- Fire up the camera
- Adjust the framerate
The RGBD guys recommend setting a lower framerate if possible. For me this means PAL, which is 25fps - Adjust the shutter speed
- A good rule of thumb is for the shutter speed to be double the framerate
- The framerate of PAL is 25fps, so 50 shutter speed
- The framerate of NTSC is 30fps, so 60 shutter speed - Adjust the exposure
- Since you have just fixed the shutter speed you will need to change the aperture and ISO
- Make sure the viewfinder is giving you an honest representation, or go by the exposure guage - Choose the MJPG for the compression format
- If you have a choice between Motion JPG (MJPEG) or AVCHD, choose Motion JPG. This will make scrubbing possible in the Visualizer when you get to that stage. If you can only shoot in AVCHD or some keyframe-based format, you will have to convert your footage to MJPG before using it in the Visualizer
4. Align the two views
We need to make sure the depth sensor and the DSLR see the same thing.
- Plug the depth sensor's USB cable into your computer, and launch the Capture app
For me this isRGBDCaptureXtionPro.app - Look at both the camera viewfinder and the depth sensor viewfinder (in the Capture app). Point the camera rig at something complex enough that you can make out the edges of each of the two viewframes
- Compare the two viewframes
Are they well aligned? - Adjust the mount until they match
- To move left and right, pan the camera on the quick release plate, and tighten it when you are done
- To tilt the camera up and down, note that the top two screws on the RGBD mount allow for movement - If you are using a zoom lens (not recommended), choose a zoom level that you are comfortable with. Then tape it down and make sure it can never move again!
- When you are happy with the alignment, firm up the remaining screws
Make sure they are decently firm. From this point forward, the DSLR cannot be allowed to move in relation to the depth sensor
When things are tight, you are ready for calibration.
5. Calibration
The calibration stage is the longest and most difficult. However if you invest a little time to learn exactly what it is we are doing, it will pay off and become easier to do. Hence, this little warm-up section will sprinkle a little context before we dive into Step 1.
Broadly speaking, the calibration stage is about getting and storing hard data about our physical rig. What size and shape are our lenses? Where exactly are they in relation to each other? This information is important. When we render the 3D scene, the Visualize app will use this information pre-warp the DSLR images so that they correctly overlay the depth images.
So, in the calibration stage we have to feed enough information into the Capture app so that it can record and correctly play back in the Visualize app. When we feed the data in, the Capture app checks to make sure the data is good enough to use, and then stores it in our Working Directory.
There are three steps in the calibration stage:
- Step 1: Depth sensor lens intrinsics
What is the size and shape of the depth sensor lens? - Step 2: DSLR lens intrinsics
What is the size and shape of the DSLR lens? - Step 3: Correspondence (lens extrinsics)
What is the exact position and orientation of the two lenses in relation to each other?
As you can see above, Steps 1 and 2 are pretty much doing the same thing - gathering information about each of the two lenses, so-called intrinsics. The reason we need to gather this information is that each individual lens out there in the world is unique, with it's own slight peculiarities of curvature and shape.
But as we'll discover when we actually go through the Steps, 1 & 2 don't feel the same. This is because the way we go about doing them is different. In Step 1, depth sensors figure out their own intrinsics, we just hit a button. But in Step 2, our DSLR can't do this. So we have to take pictures of a checkerboard and the software figures out the DSLR lens intrinsics from that.
Finally, in Step 3, we again have to use a checkerboard to figure out where the two lenses are in relation to each other. So Step 3 feels like Step 2, but really they are doing very different things.
Think of it this way. Look at the words 'intrinsics' and 'extrinsics'. Intrinsics means inside, internal - the internal properties of each lens. Extrinsics means outside, external to any lens - information not about the lenses themselves but about the real-world environment in which they exist (where the two lenses physically are in relation to each other).
Finally, note that there is a menu bar at the top of the Capture app.
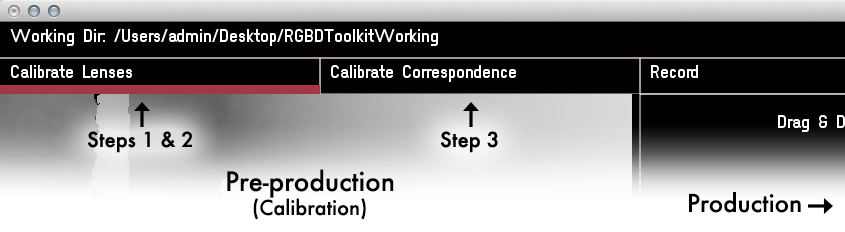
As we progress through each calibration Step, we will progress through the menu as illustrated. The first two Steps are under Calibrate Lenses and the final Step is under Calibrate Correspondence.
5a. Calibration Step 1: Depth Sensor Intrinsics
In this step, we tell the software about the characteristics of the depth sensor lens, so-called lens intrinsics. Luckily, your depth sensor has built in functionality which can gather this information for you.
- First, set your Working Directory
This is where your files will be stored going forward, including the intrinsics information, your movie files - everything, so now is the time to set it - Press
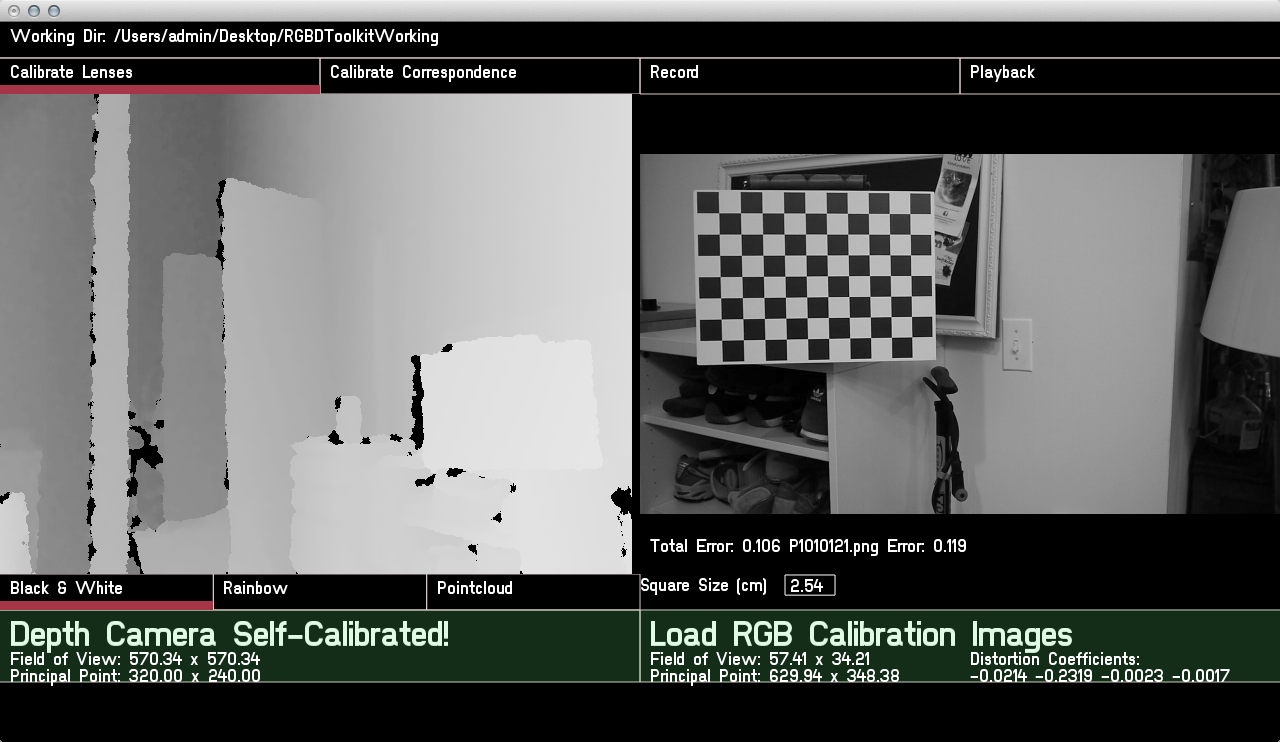
Self Calibrate Depth Cameraat the bottom of the left-hand pane
Aim your rig at an area of space which has plenty of 'visible information' - featuring different colors, contrasts and depths - It should say
Depth Camera Self Calibrated!in green - The
Principal Pointshould read as320 x 240
This is the center of the640 x 480depth sensor video stream. If you get any other numbers, repeat the process
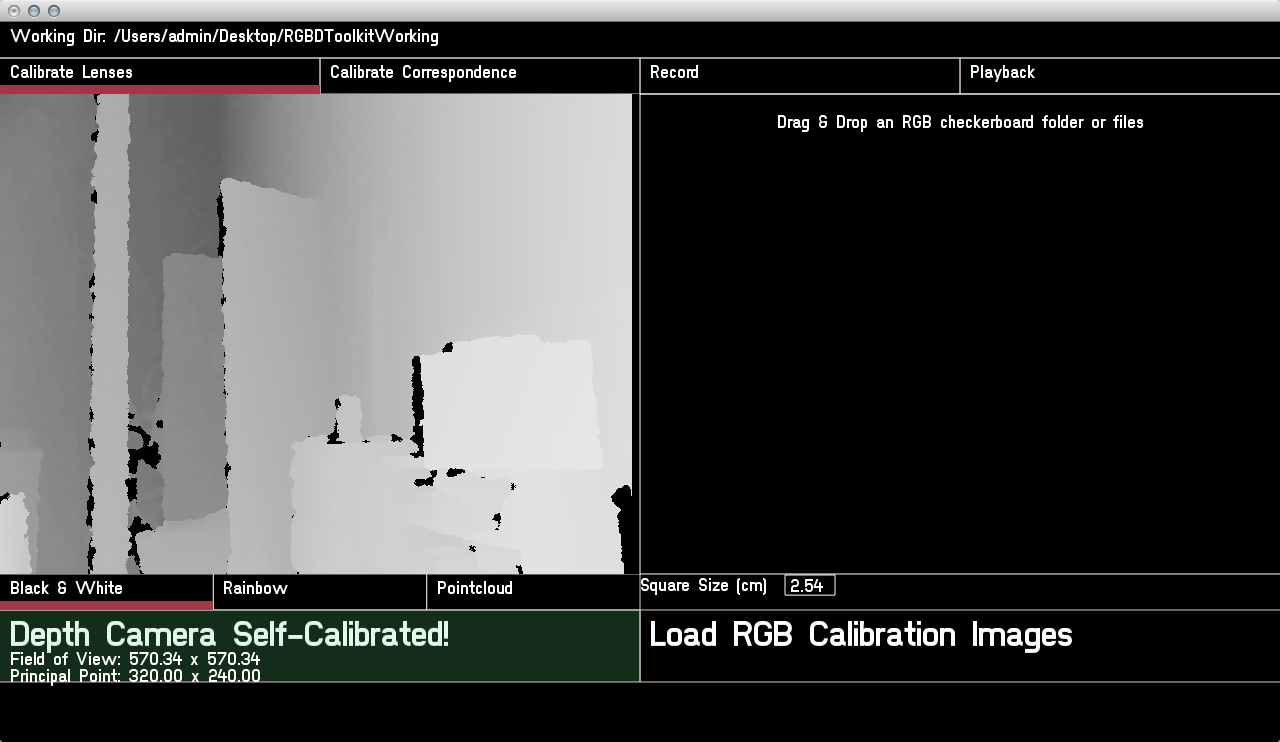
When the box under the left pane goes green, you can proceed to Step 2. Good - that was easy!
5b. Calibration Step 2: DSLR Intrinsics
It's not quite as easy to get the DSLR intrinsics. This is where you first need your checkerboard. We will put aside the Capture app for the moment and focus on your DSLR.
This stage can be frustrating at first, as you need to develop a sense of the right light and the right shots. I will try to be as clear as possible.
- Place your checkerboard on a stand so that it occupies about 1/4 of the frame
Make sure it doesn't move, or sway in the breeze - Move the camera rig so that the checkerboard is in the top left quadrant
- Don't worry if the checkerboard is not exactly horizontal or vertical
- Do ensure that the entire checkerboard is in the frame, including the white border around the outside black squares
- Make sure the checkerboard is well exposed and evenly lit - Focus the DSLR onto the checkerboard
The corners of the checkerboard should be crisp - Record 1-3 seconds video
Ensure the camera remains still after you have pressed it. Later, the software will extract the middle frame from the sequence, and it will expect to see no movement blur - Repeat the steps above, so that you cover the 4 quadrants
(top left, top right, bottom left, bottom right) - Repeat the steps above again, but this time move the checkerboard back so that you can take shots from 9 quadrants
(top left, top center, top right, mid left, mid center, mid right, bottom left, bottom center, bottom right)
The shots should look a bit like this:
You should now have a total of 13 videos of the checkerboard in different positions. The idea is to have thoroughly covered all areas of the frame.
Now that you have the videos recorded, you need to get them into the Capture app so that they can be analyzed for intrinsics information.
- Pull out your SD Card from your DSLR, or connect your DSLR's USB cable so that you can see the videos in Finder
- Select all 13 videos and drag them from Finder into the right pane in the Capture app, where it says
Drag & Drop an RGB Checkerboard folder or files - The software will hang for a few seconds, and then display a
Total Error
This is the average error across all the calibration images. Alongside this, you can view the individual error margins for each image by scrubbing the mouse from left to right across the calibration image window. - A
Total Errorof < 0.200 is desirable
If your calibration has resulted in a larger average error than this, scrub through your image set and look for any outlier images which have an error of > 0.300. Note the filename of any outliers. You can re-perform the analysis at any time, simply by dragging the videos onto the window pane again - this time excluding the erroneous clips. This should improve yourTotal Error.
When the Total Error is low enough, the box under the right pane will go green, and you can proceed to Step 3.
The good news is, you only have to do this once for each lens. Once you have correctly gathered the intrinsics information, it is sitting safely in your current Working Directory for reuse (you can copy & paste it to a new Working Directory). Even though you may have to recalibrate the correspondence (Step 3) each time you take apart your rig, you will be able to reuse the information gathered in Steps 1 and 2.
5c. Calibration Step 3: Correspondence
When you get to this stage, you've done the hardest part. Now we are doing the coolest part. We are telling the software where the two lenses are in relation to each other, which is how the overlay effect is constructed.
- Click the
Calibrate Correspondencetop-menu item in the Capture app
You should see a screen which looks like this:
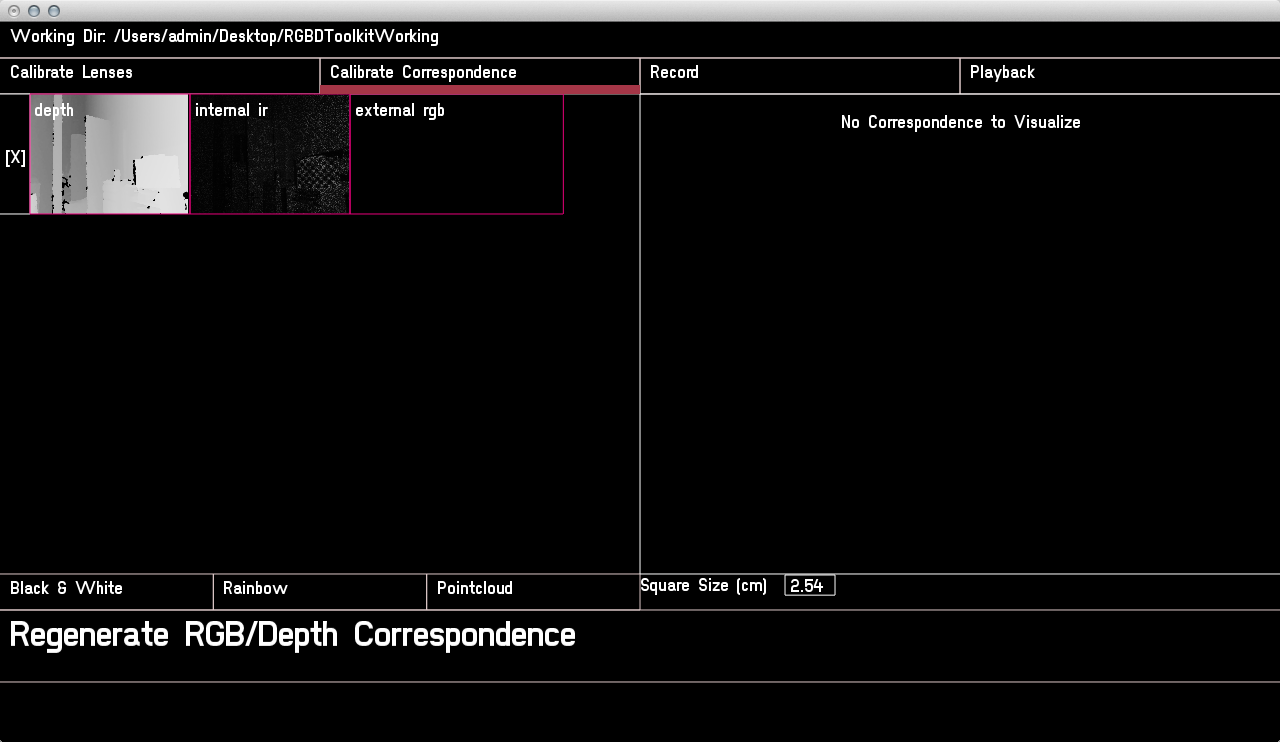
To calibrate correspondence, we need to match up three images:
- The RGB image from the DSLR
- The infra-red image from the depth sensor
- The computed depth map from the depth sensor
If you are not sure about these terms, particularly 'infra-red image' and 'computed depth map', check out this quick explanation of how depth sensors work. It will help you going forward to get a sense of what the depth sensor is actually doing.
We can see in the Capture app that there are slots for each of these three images, and they are organized into columns so that we can take images of the checkerboard at different distances from the rig. Taking images at different depths ensures that the overlay is correct when the items we shoot move from the near range to the far range.

As we start taking pictures going forward, the rows will start to appear. If we ever want to delete a row, just use the [x] on it's right-hand side.
Before you start, make sure there are no other depth sensors or infra-red devices pointing in the direction of your rig.
- Place the checkerboard so that it fills up a large part of the frame
- Focus your DSLR onto the checkerboard
- Click the depth map column
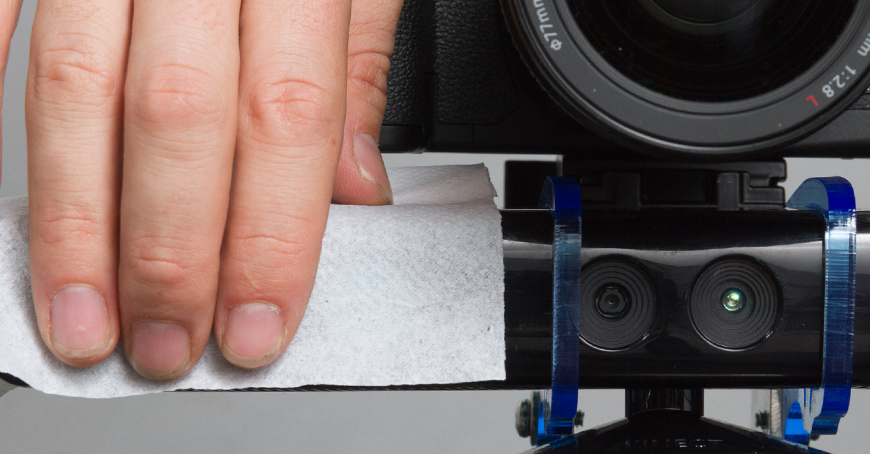
There is a brief pause while the picture is taken - Place a piece of tissue over the infra-red projector on the depth sensor
The tissue diffuses the infra-red dots so that the software can make out the edges on the checkerboard
- Red dots should appear over the checkerboard
- If they don't, you may have an issue with glare, try re-angling the checkerboard
- It may also be that the tissue paper you have used is too thick or the light in the room not bright enough. Try variations.
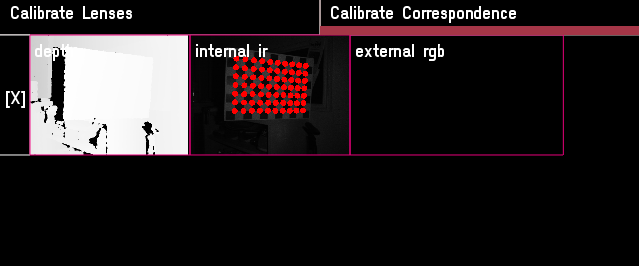
- While the red dots are showing, click the infra-red camera column
There is a brief pause while the picture is taken. A new row will appear in the software, and the DSLR column will remain blank. This is normal, later we will drag the captured DSLR shots into these empty spaces - Remove the tissue
- Take a 1-3 second video with your DSLR
Don't forget this!
Repeat the above process three more times, each time stepping the checkerboard back a little, so that you cover different depths.
Once you have four sets:
- Get the video files off your camera and drag them one-by-one into the corresponding empty slots in the software, so that all slots in all columns are now filled
- Cross your fingers
- Click
Regenerate RGB/Depth Correspondence
If the calibration fails, you can try IGNOREing one or two of the sets, or just try running again with all four (there is a little bit of randomness in the algorithm). If you can't get it to calibrate, you will need to improve the quality of your setup and try again.
If the calibration succeeds, the bottom of the right pane will turn green, and an image of your checkerboard will appear on the right. Using the keys A, S, D, W and the mouse you can navigate around the picture and see where the Capture app thinks the dots should be. The dots are color-coded against the colored frames of the rows on the left.
If you have a good set of dots in the places where you would expect them to be, congratulations! You have a good calibration.
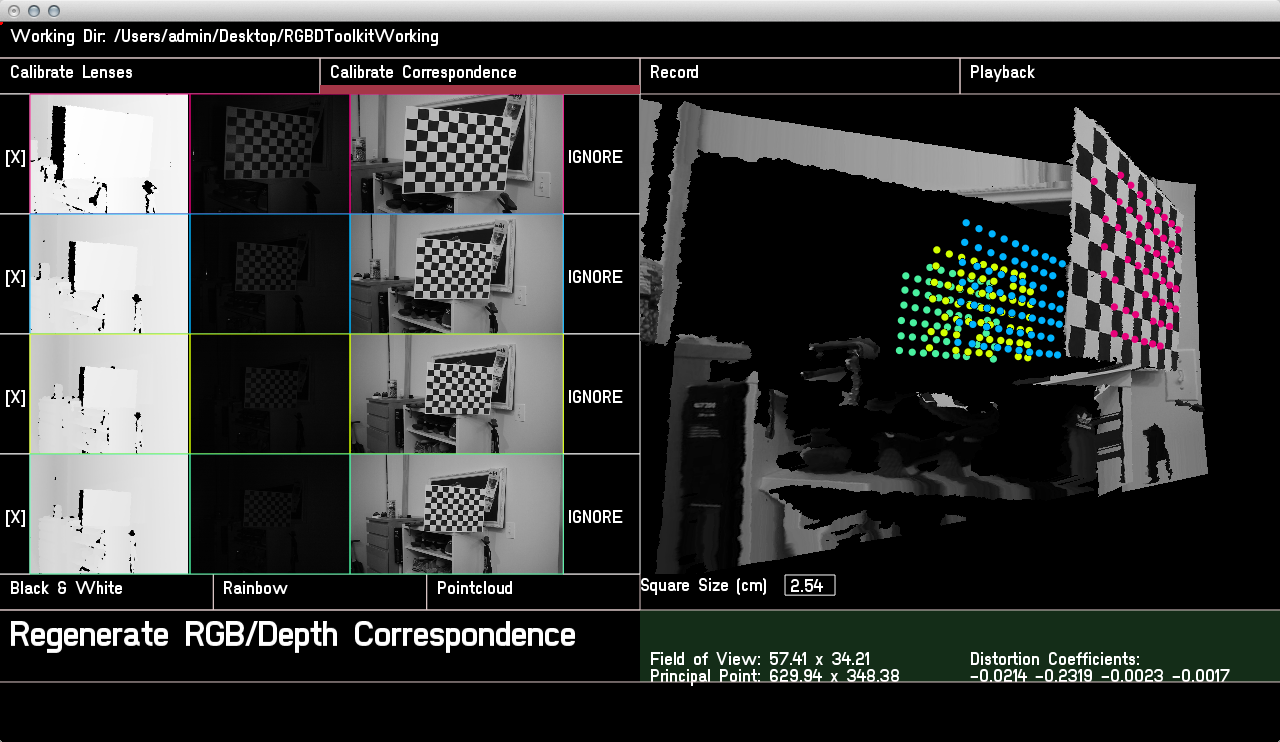
If your screen looks like something like this, you are now ready for the production phase - you are ready to record!