I have written a leightweight manager for Adam Carlucci's excellent ofxAudioUnit, named ofxAudioUnitManager.
The manager allows you to deal with chains of Audio Units and sets of presets with your keyboard at runtime, and to design new chains with just a few lines of code. You can show and hide the control panel above by hitting 'v'.
What is this addon for?
The purpose of this addon is to make it easy to experiment with sound design in your apps.
To do this, the addon automates tasks associated with using ofxAudioUnit that are not related to sound design. It then puts in place a helpful interface allowing you to experiment, save and experiment more, often without recompiling.
How to design a chain
Declare the manager and the units you would like to use in the header file. The classes below are all bundled with ofxAudioUnitManager, each wrapping ofxAudioUnit classes to simplify their usage:
    ofxAudioUnitManager manager;
    AudioUnitChain chain;
    TALNoiseMaker noiseMaker;
    LowPassFilter filter;
    Reverb reverb;
Over in the cpp file you can declare and initialise a chain in three easy steps. First, have the manager set up the chain with a name and a colour:
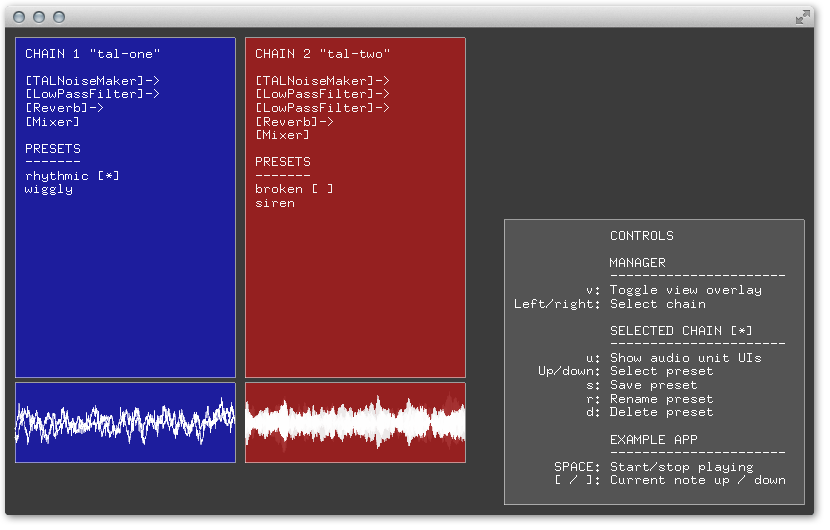
manager.add(&chain, "tal-one", ofColor::blue);
Then, load the units into the chain, in the order you would like them connected:
    chain.link(&noiseMaker)
         .to(&filter)
         .to(&reverb)
         .toMixer();
Finally, now that the units are loaded you can read presets from disk:
manager.loadPresets(&chain);
That's all you need to do. This code will give you the blue chain shown in the image above.
Managing presets
Use the left and right arrow keys at runtime to select different chains. Use the up and down arrow keys to switch between presets on a chain.
On the disk, presets are saved in bin/data in a directory named AudioUnitPresets:

Inside AudioUnitPresets each chain has a folder (named when you initialise the chain in your code). Inside each chain folder are directories for each of the presets. These you save and name from the ofxAudioUnitManager user interface.
Inside each preset folder are the individual preset files, one for each unit in the chain.
Changing the unit order
You are free to experiment with the order of your chain without losing your presets. For example let's imagine you start off with this chain, and save a selection of presets:
    chain.link(&noiseMaker)
       //presets saved as
       //../preset-name/LowPassFilter.aupreset
     .to(&filter)
       //presets saved as
       //../preset-name/Reverb.aupreset
     .to(&reverb)
     .toMixer();
Later you decide to switch the filter and reverb:
    chain.link(&noiseMaker)
       //presets saved as
       //../preset-name/Reverb.aupreset
     .to(&reverb)
       //presets saved as
       //../preset-name/LowPassFilter.aupreset
     .to(&filter)
     .toMixer();
The presets you originally created will still apply to the correct units as they are named after the class name of the unit.
Naming your units
The only complication with the storage technique described above is if you want to chain two units of the same type. In this scenario it is best to name the units with string arguments:
    LowPassFilter filter1, filter2;

    chain.link(&noiseMaker)
       //presets saved as
       //filter1_LowPassFilter.aupreset
     .to(&filter1, "filter1")
       //presets saved as
       //filter2_LowPassFilter.aupreset
     .to(&filter2, "filter2")
     .to(&reverb)
     .toMixer();
This will prevent naming conflicts when the manager attempts to load and save presets.
If you decide to add or change a unit's name after you have already been using it, remember to go into the preset folders and update the names there too. Otherwise the manager will generate new preset files the next time you run it.
In this circumstance, the new and old preset files will sit alongside each other on the disk. However only the new preset files will be used by the manager.
Sending MIDI to your chains
This addon uses ofxBpm and ofxMidi to allow you to send MIDI sequences at timed intervals.
    void ofApp::setup() {
        ofAddListener(bpm.beatEvent, this, &ofApp::play);
    }

    void ofApp::play(void){
        //Each chain exposes it's ofxMidi instance
        chain.midi()->sendNoteOn(1, 60);
    }
Each chain sets up an ofxMidi instance and provides access for you to manipulate it.
Adding new units
Each time you want to work with new Audio Units in ofxAudioUnitManager, you will have to create a new class. However, all of the hard work is taken care of in the base class AudioUnitBase, and your class only need contain a few lines:
    void TALNoiseMaker::setup() {
        unit = ofxAudioUnit('aumu', 'ncut', 'TOGU');
        type = AU_TYPE_SYNTH;
        className = "TALNoiseMaker";
        AudioUnitBase::setup();
    }
The header file is similarly sparse. As a convention the supported parameter list for each unit is listed as consts in the header:
    class TALNoiseMaker : public AudioUnitBase {
    public:
        void setup();
    };

    const static int TALNoiseMaker_volume = 1;
    const static int TALNoiseMaker_filtertype = 2;
    const static int TALNoiseMaker_cutoff = 3;
    //.. etc for all parameters
This enables you to quickly find and set parameters in your general code:
    float cutoff = ofMap(sin(ofGetFrameNum() * 0.05), -1, 1, 0, 1);
    noiseMaker.set(TALNoiseMaker_cutoff, cutoff); //Automate the parameter
In practice only takes a moment to create these classes, using the existing classes as a template.
Obviously there's a world of Audio Units out there and this addon only has a small subset. If you would like to contribute, you can send pull requests with additional units that you use.
How to try out this addon
Check out the instructions at the bottom of the github readme.